Ceph CRUSH 设计实现剖析
CRUSH(Controlled Replication Under Scalable Hashing)是 Ceph 存储系统中用于数据分布和复制的算法。关于 CRUSH 的论文解析参考: 译 - CRUSH: Controlled, Scalable, Decentralized Placement of Replicated Data 。CRUSH map 是 Ceph 集群中一个关键的配置组件,它定义了数据如何在集群的物理硬件上分布。 CRUSH 算法使得 Ceph 能够在无需中心化或者分布式元数据管理器的情况下,高效、可靠地进行数据复制和恢复。
一、CRUSH map 解析
CRUSH map 包含了集群的层次结构和各种规则,这些规则定义了数据应该如何在集群中分布。 CRUSH map 主要包含以下几个部分:
Tunables: 一组可用于调整 CRUSH 算法行为的参数。Devices: 定义集群中所有可用的存储设备的列表。Types: 定义存储层次结构中的不同层级类型。Buckets: 组织和管理存储设备(如 OSDs )的逻辑容器。Rules: 定义了数据的复制方式。
新建 crush map 相关代码:
|
相关命令:
|
CRUSH map 示例:
|

1.1、Tunables
一组可用于调整 CRUSH 算法行为的参数。通过调整这些参数,管理员可以优化数据的分布和复制策略,以适应特定的性能需求或硬件配置。
|
字段解析:
choose_local_tries: 控制 CRUSH 算法在尝试找到一个本地副本(即在同一物理位置,如同一机架或同一数据中心)时的尝试次数。如果设置为 0 ,表示 CRUSH 算法不会尝试在本地找到副本。增加这个值会使算法更倾向于在本地找到副本,可能提高访问速度但减少数据分散度。choose_local_fallback_tries: 定义了在 choose_local_tries 未能找到本地副本后, CRUSH 算法尝试找到非本地副本之前的额外本地尝试次数。如果设置为 0 ,表示没有额外的本地回退尝试。增加这个值可以增加在本地找到副本的机会,同样可能影响数据的分散度和容错性。choose_total_tries: 定义了 CRUSH 算法在放弃之前尝试选择不同项的总次数。较低的值可能导致数据分布不均,而较高的值增加了计算复杂性,但可以改善数据的均匀分布。chooseleaf_descend_once: 控制 CRUSH 算法在选择叶节点(通常是存储设备)时是否只遍历树结构一次。设置为 1 时,算法只遍历一次,减少了计算量并提高了效率,但可能影响在复杂拓扑中的数据分布精度。chooseleaf_vary_r: 控制每次选择叶节点时种子是否有所变化,以增加随机性。设置为 1 时,每次选择过程的随机性增加,有助于数据的均匀分布。chooseleaf_stable: 确保相同的输入在 CRUSH 算法的不同版本中给出相同的输出。设置为 1 时,可以保持数据分布的一致性,特别是在升级或修改集群配置时。straw_calc_version: 指定使用 Straw 算法的版本, Straw 算法用于决定数据在不同存储桶之间的分配。版本 1 是较旧的版本,可能不如版本 2 在数据分布上有效和均匀。allowed_bucket_algs: 指定允许使用的 bucket 算法的位掩码。通过限制或启用特定的 bucket 算法,管理员可以根据具体的数据分布需求调整算法的使用,影响数据的分布和性能。
1.2、Devices
定义集群中所有可用的存储设备的列表。每个设备通常对应一个 OSD(Object Storage Daemon)。每个条目通常包含: 设备ID,OSD编号,类别。device 的 id 都是大于等于零的非负数。
|
1.3、Types
定义存储层次结构中的不同层级类型。
字段解析:
|
1.4、Buckets
用来组织和管理存储设备(如 OSDs )的逻辑容器。每个 bucket 可以包含 OSDs 或其他 buckets ,形成一个层次化的结构,这有助于定义数据在集群中的分布方式。 bucket 的设计允许 CRUSH 算法模拟物理存储的层次结构,如机架、行、数据中心等,以及在这些层次上实施数据复制和负载均衡策略。bucket 的 id 都是小于零的负数。
|
字段解析:
host/root: bucket 类型。对应于 CRUSH 层次结构中的一个层级,如 host、rack、datacenter 等。node01/default: bucket 名称。通常反映其在物理或逻辑结构中的角色,如 node01、default 等。id: bucket id。这个 id 在 CRUSH map 中是唯一的,用于区分不同的 buckets。alg: bucket 算法。bucket 使用特定的算法来决定如何在其包含的项( OSDs 或其他 buckets )之间分配数据。常见的算法包括 uniform/list/tree/straw/straw2 。uniform: 对应 CRUSH_BUCKET_UNIFORM 。一种简单的分配策略,其中所有子项都具有相同的权重,适用于所有子项具有均等的存储容量和性能的情况。list: 对应 CRUSH_BUCKET_LIST 。按照列表中的顺序和指定的权重来分配数据,允许管理员精确控制数据分配的顺序,适用于需要按特定顺序优先分配数据的场景。tree: 对应 CRUSH_BUCKET_TREE 。基于树形结构的数据分配方法,其中数据是按层次结构递归分配的。适用于复杂的层次结构,如多层数据中心的环境,它可以有效地在多个层级上平衡数据分布。straw: 对应 CRUSH_BUCKET_STRAW 。使用一种称为 straw 算法的方法来分配数据。每个子项被赋予一个 straw ,其长度与子项的权重成比例。选择子项的概率与其 straw 的长度成正比。适用于子项之间权重差异较大的情况。straw2: 对应 CRUSH_BUCKET_STRAW2 。straw 算法的改进版本,它修正了原始 straw 算法中的一些不平衡问题,提供了更加均匀和公平的数据分配。在各种场景下都能提供更好的负载均衡和数据分散性。
hash: hash 函数。用于决定如何在 bucket 的子项之间选择。常见的哈希函数包括 rjenkins1(对应配置参数为 0 ) 。item: bucket 子项。这些子项可以是 OSDs(Object Storage Daemons)或者是其他的 buckets 。每个条目定义了子项的 ID 、权重以及其他可能的属性。
部分桶算法的比较:
| 桶算法 | 时间复杂度 | 添加 | 移除 |
|---|---|---|---|
| uniform | O(1) | 差 | 差 |
| list | O(n) | 优 | 差 |
| straw2 | O(n) | 优 | 优 |
1.5、Rules
定义了数据的复制方式。例如,一个规则可能指定一个数据块应该被复制三次,并存储在不同的机架上以确保容错。
|
字段解析:
rule: rule 标记。replicated_rule: rule name。自定义的 rule 。id: rule id。规则的唯一标识符。type: rule type。可选值为 replicated/erasure/msr_firstn/msr_indep 。replicated: 最常用的规则类型,用于创建数据的多个副本。每个数据对象会在多个物理位置存储相同的副本,以提高数据的可用性和耐久性。适用于需要高数据可靠性和快速恢复能力的场景。如果一个存储节点失败,其他节点上的副本可以立即提供数据,无需复杂的恢复过程。erasure: 使用纠删码技术,将数据分割成多个数据块和校验块。这种方法可以在保持相似的容错能力的同时,比简单复制更有效地使用存储空间。适用于大规模数据存储,特别是当存储成本是一个重要考虑因素时。虽然纠删码提供了高存储效率,但其恢复过程可能比复制更复杂,对性能的影响也较大。msr_firstn: MSR (Multi-Site Replication) 是一种多站点复制策略,其中 FirstN 指的是在多个站点中选择前 N 个站点进行数据复制。适用于需要跨地理位置进行数据复制的场景,以实现灾难恢复和数据本地化。FirstN策略确保数据被复制到指定数量的最优站点,通常基于位置或其他标准选择。msr_indep: MSR (Multi-Site Replication) 是一种多站点复制策略,其中 IndeP 指数据在每个站点独立地被复制和管理,而不是选择固定数量的站点。这种模式适用于那些需要在每个站点独立管理数据的场景,允许每个站点根据本地需求和策略来优化数据存储和访问。这种类型的复制可以提高灵活性和数据自治。
step:take: 指定了 CRUSH 算法开始选择的起点。通常,这个起点是一个 bucket ,例如一个数据中心、机架或服务器组。chooseleaf: 选择方式。选择存储数据的叶子节点。叶子节点通常是指实际存储数据的设备,如硬盘或SSD。choose: 选择方式。类似于 chooseleaf ,但不限于选择叶子节点。 choose 可以用于在任何级别的 bucket 中进行选择。该操作允许在非叶子级别进行更复杂的数据分布决策,例如在不同的数据中心或机架之间进行选择。firstn: 选择模式。指定选择的叶子节点的数量。这个数字可以是具体的数量,也可以是 0 (表示根据复制因子自动确定数量)。常用于需要固定数量副本的场景,如在多个数据中心或机架中复制数据,确保数据的高可用性和冗余。indep: 选择模式。表示每次选择都是独立的,不受之前选择的影响。这意味着即使多次执行相同的选择操作,也可能得到不同的结果。适用于需要增强随机性和分布均匀性的场景。它有助于避免因选择过程中的依赖关系而导致的数据局部化和热点问题。type: 指定叶子节点的类型,如 host、rack 等,这决定了数据复制的物理分隔程度。emit: 标志着选择过程的结束,输出最终确定的存储目标。
二、对象映射规则
数据对象到 OSD 的映射主要包含两个阶段:
- 对象映射到 PG:简单的哈希。
- PG 映射到 OSD 列表:CRUSH 伪随机算法。
2.1、对象映射到 PG
概要代码:
|
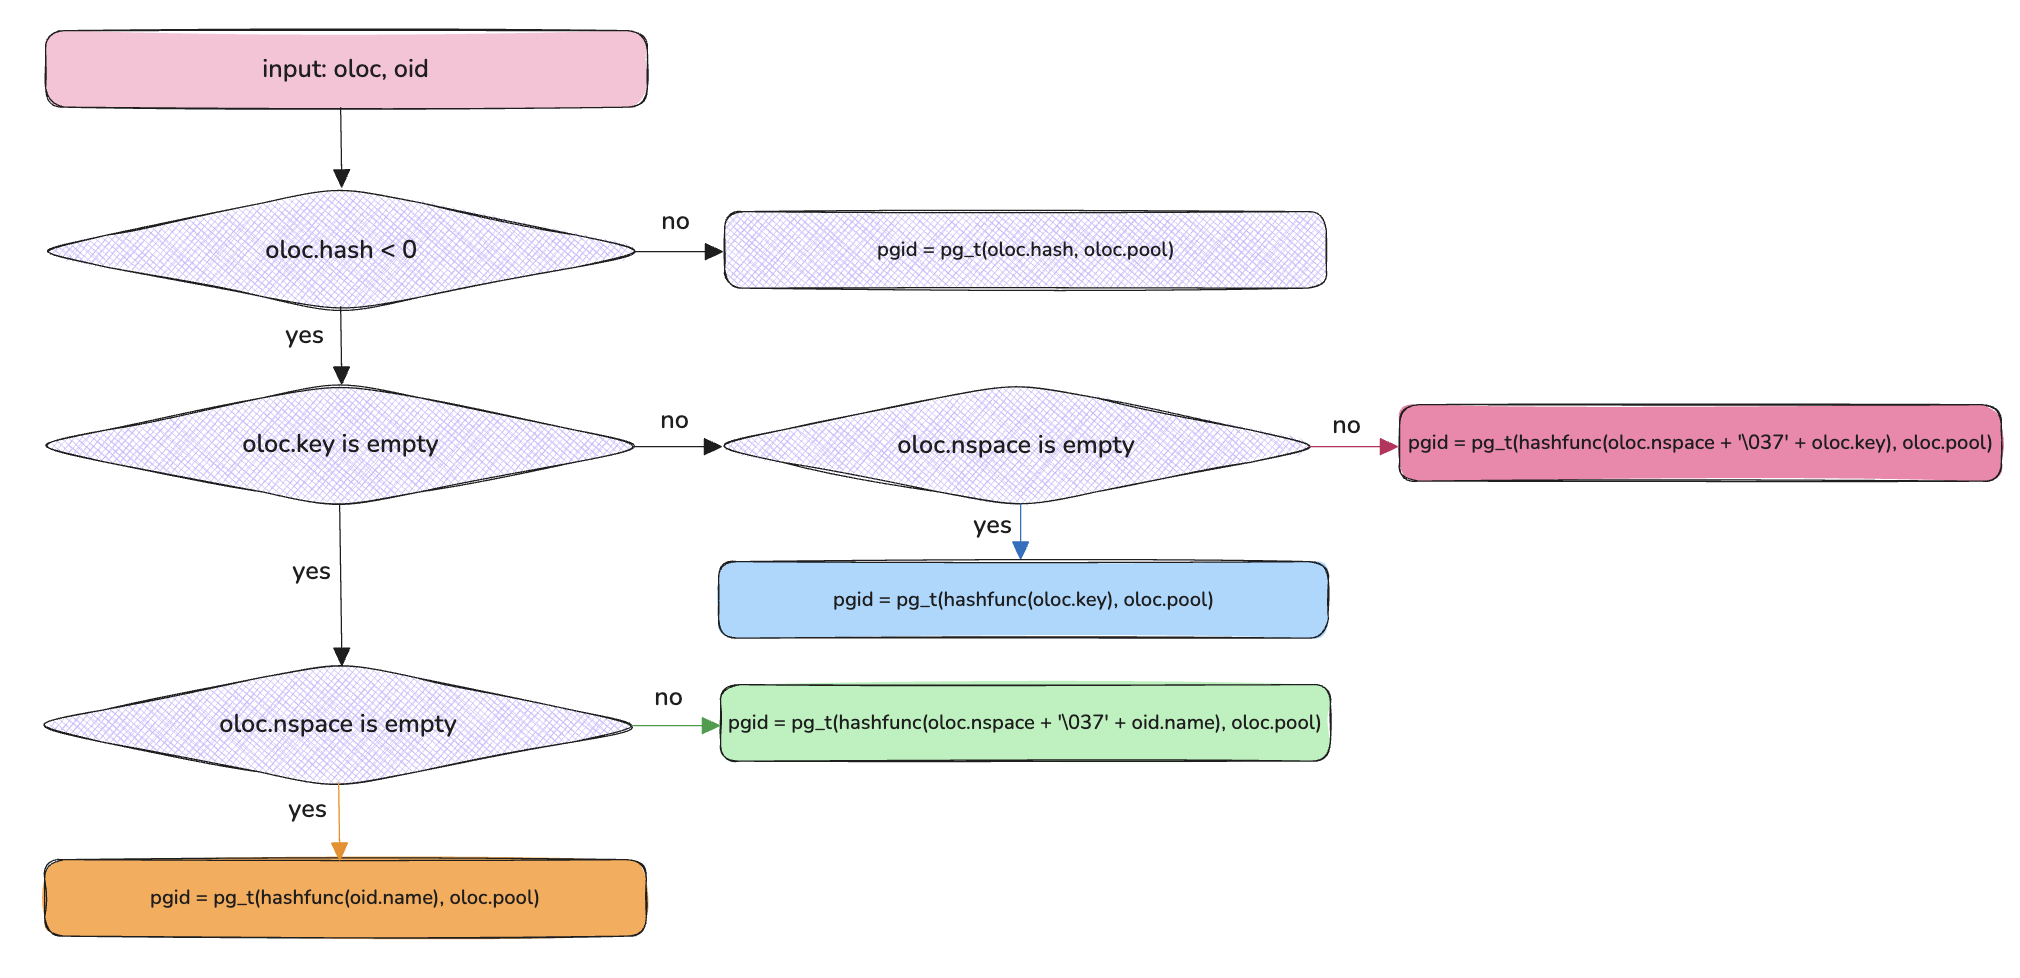
计算 pgid 的规则如下: (注意这里的 hashfunc 为特定 pool 的 hash 类型,目前支持 linux 和 rjenkins 这两种类型,默认为 rjenkins)
- 如果
oloc.hash >= 0: 则pgid = pg_t(oloc.hash, oloc.pool) - 如果
oloc.hash < 0 && oloc.key 非空 && oloc.nspace 非空: 则pgid = pg_t(hashfunc(oloc.nspace + '\037' + oloc.key), oloc.pool) - 如果
oloc.hash < 0 && oloc.key 非空 && oloc.nspace 为空: 则pgid = pg_t(hashfunc(oloc.key), oloc.pool) - 如果
oloc.hash < 0 && oloc.key 为空 && oloc.nspace 非空: 则pgid = pg_t(hashfunc(oloc.nspace + '\037' + oid.name), oloc.pool) - 如果
oloc.hash < 0 && oloc.key 为空 && oloc.nspace 为空: 则pgid = pg_t(hashfunc(oid.name), oloc.pool)
计算 mpgid 的规则如下:
- 规则前提: pg_num_mask 是将 pg_num 向上取到最近的二次幂数值,然后减一得到的(pgp_num 和 pgp_num_mask 关系亦如此)。比如 pg_num=16,则 pg_num_mask=15; pg_num=10,则 pg_num_mask=15;
- 计算规则:
- 如果
(pgid.m_seed & pg_num_mask) < pg_num, 则mpgid.m_seed = pgid.m_seed & pg_num_mask - 如果
(pgid.m_seed & pg_num_mask) >= pg_num, 则mpgid.m_seed = pgid.m_seed & (pg_num_mask >> 1)
- 如果
- 参考数值计算示例:
| pgid.m_seed | pg_num | pg_num_mask | (pgid.m_seed & pg_num_mask) < pg_num | mpgid.m_seed |
|---|---|---|---|---|
| 7 | 10 | 15 | Yes | 7 & 15 = 7 |
| 12 | 10 | 15 | No | 12 & (15 >> 1) = 4 |
| 133 | 16 | 15 | Yes | 133 & 15 = 5 |
对象映射到 PG 的相关代码实现:
|
2.2、PG 映射到 OSD 列表
根据上一步生成的 pgid 信息,之后利用 CRUSH 伪随机算法,便可以计算出最终映射的 osd 列表。 注意:虽然 rule 存在 replicated 和 erasure 等不同的类型,但是关键的计算 osd 列表的逻辑都是相同的,只是在处理可用 osd 列表的顺序时,逻辑有些不同,具体实现可以参考 OSDMap::_raw_to_up_osds 函数。
部分关键函数:
|
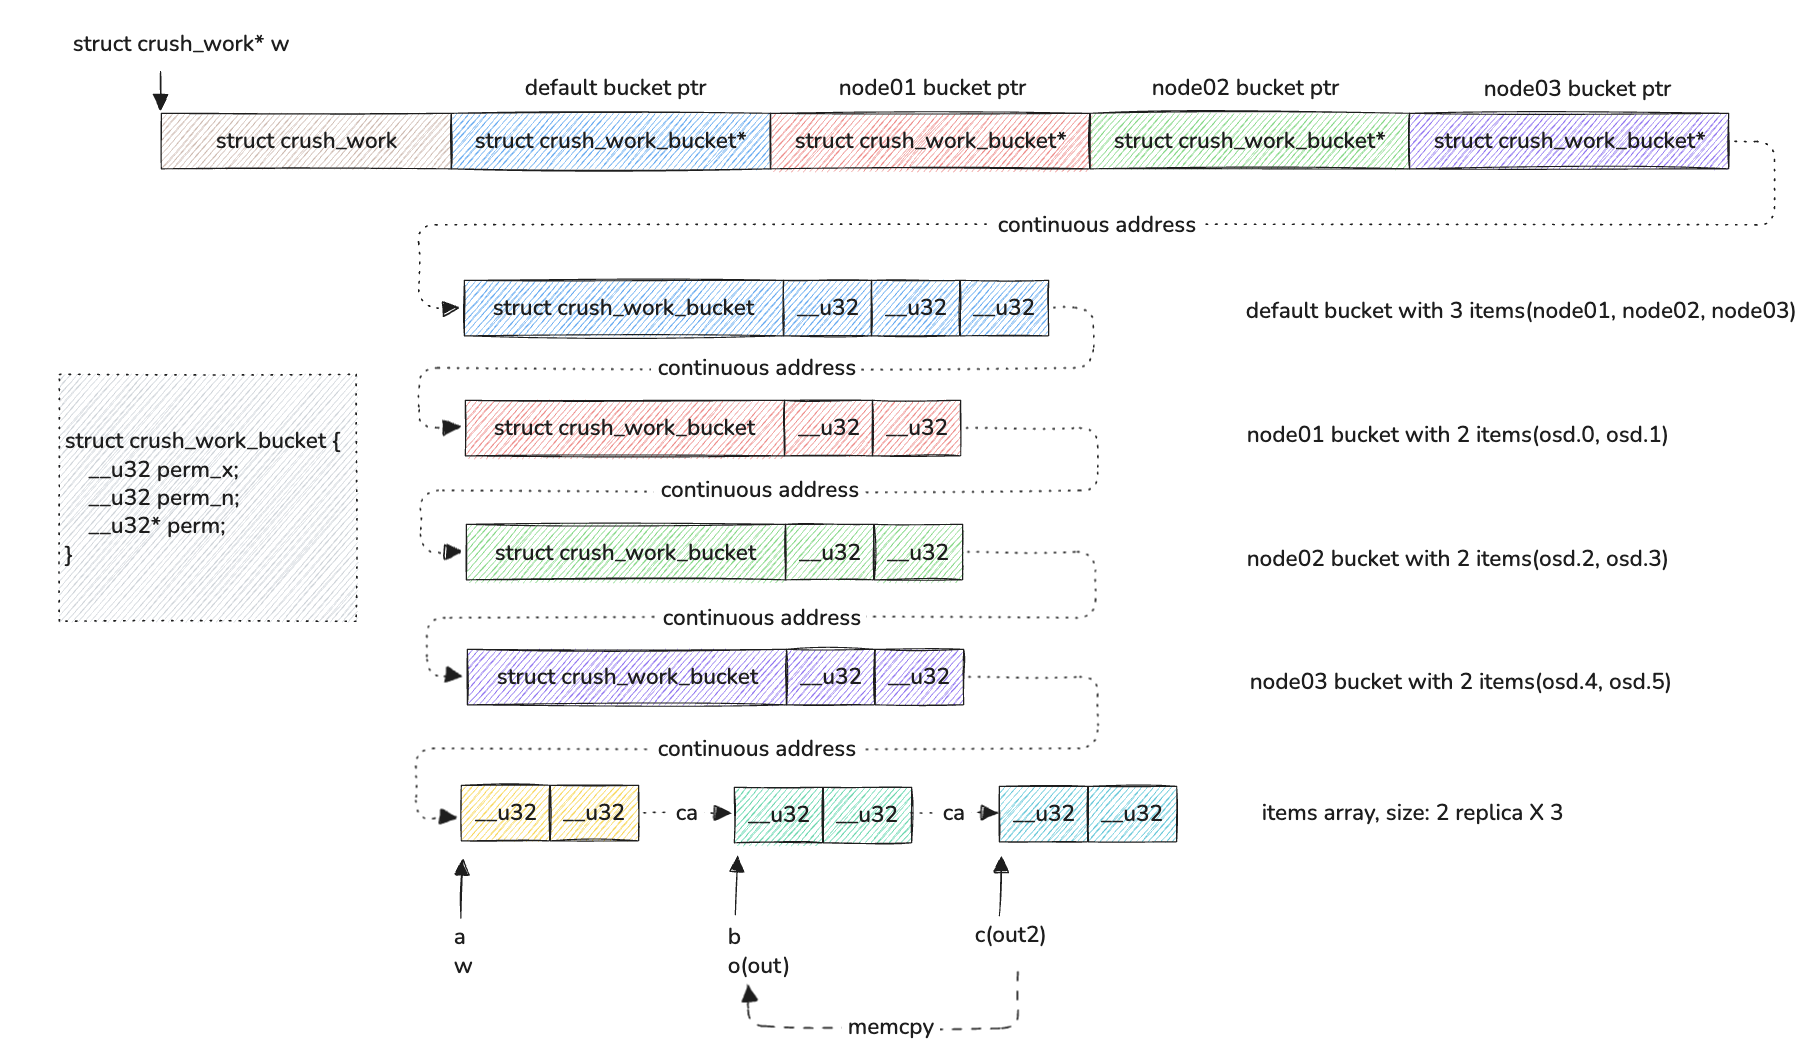
2.2.1、数组空间初始化
当通过 CRUSH 计算出最终的 osd 列表前,我们需要现在准备存储 osd 的空间,该空间对应的是一个 char 数组,对应代码为 char work[crush_work_size(crush, maxout)] 。在计算 osd 列表的时候会传入两个数组变量,一个是 out ,另一个是 out2 ,其中 out 用于存储非叶子节点的 item ,out2 用于存储叶子节点的 item 。
相关函数如下:
|
假设 crush map 的构成信息图如上最开始所示,则其对应的 work 数组空间如下所示:
2.2.2、获取OSD主流程
关键函数如下:
|
crush_do_rule_no_retry 函数内部会针对不同的 step 执行不同的操作,详细如下:
CRUSH_RULE_SET_CHOOSE_TRIES: 对应操作为step set_choose_tries;CRUSH_RULE_SET_CHOOSELEAF_TRIES: 对应操作为step set_choose_local_tries, 会覆盖 chooseleaf_descend_once 参数, 相关的参数还有 choose_total_tries ;CRUSH_RULE_SET_CHOOSE_LOCAL_TRIES: 对应操作为step set_choose_local_tries,对应配置为 choose_local_tries ;CRUSH_RULE_SET_CHOOSE_LOCAL_FALLBACK_TRIES: 对应操作为step set_choose_local_fallback_tries,对应配置为 choose_local_fallback_tries ;CRUSH_RULE_SET_CHOOSELEAF_VARY_R: 对应操作为step set_chooseleaf_vary_r,对应配置为 chooseleaf_vary_r ;CRUSH_RULE_SET_CHOOSELEAF_STABLE: 对应操作为step set_chooseleaf_stable, 对应配置为 chooseleaf_stable ;CRUSH_RULE_TAKE: 对应操作为step take;CRUSH_RULE_CHOOSELEAF_FIRSTN: 对应操作为step chooseleaf firstn;CRUSH_RULE_CHOOSE_FIRSTN: 对应操作为step choose firstn;CRUSH_RULE_CHOOSELEAF_INDEP: 对应操作为step chooseleaf indep;CRUSH_RULE_CHOOSE_INDEP: 对应操作为step choose indep;CRUSH_RULE_EMIT: 对应操作为step emit;
2.2.3、Choose Firstn 逻辑
当 step 操作方式为 chooseleaf firstn 或者 choose firstn 时,会执行到 crush_choose_firstn 函数的处理逻辑中,这种方式意味着会选择前 N 个符合条件的元素。
示例 rule:
|
选择 item 的伪代码总结:
|
选择 item 的详细代码解析:
|
2.2.4、Choose Indep 逻辑
示例 rule:
|
选择 item 的伪代码总结:
|
选择 item 的详细代码解析:
|
三、Bucket 算法详解
不同类别的算法实现介绍:
uniform: 它假定整个集群的设备容量是均匀的,并且设备数量极少变化,他不关心子设备中配置的权重,而是直接通过哈希算法将数据均匀的分布到集群中,时间复杂度O(1),优点是计算速度快,缺点是适用范围有限。list/tree: 这两种属于分治算法,问题在于各子元素的选择概率是全局相关的,所以子元素的增加、删除和权重的改变都会在一定程度上影响全局的数据分布,由此带来的数据迁移量并不是最优的。list: 它会逐一检查各个元素,并根据权重确定选中对应子元素的概率,时间复杂度O(n),优点是在集群规模不断增加时能最小化数据迁移,缺点是移除旧节点时会导致数据重新分配。tree: 它使用了二叉搜索树,让搜索到各子元素的概率与权重一致,时间复杂度O(logn),优点是较好适应集群规模的增减,缺点是 Ceph 实现有缺陷,不推荐使用。
straw/straw2:straw会让所有子元素独立的互相竞争,类似于抽签机制,让子元素的签长基于权重分布,并引入一定的伪随机性,时间服复杂度为O(n),由于子元素签长的计算仍然会依赖于其他子元素的权重,所以并没有能够完全解决最小数据迁移量问题。straw2的提出解决了 straw 存在的问题,在计算子元素签长时不会依赖于其他子元素的状况,保证数据分布遵循权重分布,并且在集群规模变化时拥有最佳的表现。
桶算法的比较:
| 桶算法 | 选择的时间复杂度 | 元素添加 | 元素移除 |
|---|---|---|---|
| uniform | O(1) | 差 | 差 |
| list | O(n) | 良 | 差 |
| tree | O(log(n)) | 优 | 优 |
| straw | O(n) | 更优 | 更优 |
| straw2 | O(n) | 良 | 良 |
3.1、Uniform Buckets
在大型存储系统中,通常不会单独添加某个设备(个别故障除外),而是批量添加一组设备,用于扩容或者替换寿命到的设备。因此将它们视为一个单元是很自然的。在这种情况下,uniform buckets 用于表示一组相同的设备。这样做的主要优势在于性能:CRUSH 可以在常数时间内将副本映射到桶中。如果桶的大小发生变化,则设备之间的数据将完全重新排列,就像传统的基于哈希的分发策略一样。
代码解析:
|
3.2、List Buckets
list buckets 将其内容构建为链表,并且可以包含具有任意权重的项目。为了放置副本, CRUSH 从列表头部开始,包含最新添加的项目,并将其权重与所有剩余项目的权重之和进行比较。根据 hash(x, r, item) 的值,要么以适当的概率选择当前项目,要么该过程继续递归地沿着列表向下进行。这种方法源自 RUSHp ,将放置问题重新定义为 “最近添加的” 问题。 “是新项目,还是旧项目?” 对于不断扩展的集群来说,这是一个自然而直观的选择,要么以适当的概率将对象迁移到最新的设备,要么像以前一样保留在旧设备上。当项目添加到存储桶时,其结果是最佳的数据迁移。然而,从列表中间或尾部移除项目可能会导致大量不必要的移动,因此列表存储桶最适合于从不(或很少)收缩的情况。
RUSHp 算法大致相当于一个两级 CRUSH 层次结构,由一个包含多个 uniform buckets 的 list buckets 组成。其固定的集群表示形式排除了使用放置规则或 CRUSH 故障域来控制数据放置以增强可靠性的可能性。
代码解析:
|
3.3、Tree Buckets
与任何链表数据结构一样,list buckets 对于较小的项目集非常高效,但对于较大的项目集可能不太适用,因为其 O(n) 运行时间可能过长。源自 RUSHt 的树形桶通过将其项目存储在二叉树中解决了这个问题。这将放置时间缩短至 O(log(n)),使其适合管理更大的设备集或嵌套桶。 RUSHt 相当于一个两级 CRUSH 层次结构,由一个包含多个 uniform bucket 的 tree buckets 组成。
tree buckets 的结构为带权二叉搜索树,其项目位于叶子节点。每个内部节点都知道其左右子树的总权重,并根据固定策略进行标记(详见下文)。为了在存储桶中选择一个项目,CRUSH 从树的根节点开始,计算输入键 x、副本数量 r、存储桶标识符以及当前树节点(最初为根节点)的标签的哈希值。将结果与左右子树的权重比进行比较,以决定接下来要访问哪个子节点。此过程重复进行,直到到达叶子节点,此时存储桶中的相关项目将被选中。只需进行 log(n) 次哈希运算和节点比较即可定位项目。
存储桶的二叉树节点采用简单的固定策略标记二进制值,以避免在树增长或收缩时标签发生变化。树中最左边的叶子节点始终标记为 “1”。每次树扩展时,旧根节点都会成为新根节点的左子节点,并且树中最左边的叶子节点始终带有标签,新的根节点的标签将旧根节点的标签向左移动一位(例如 1、10、100 等)。树右侧的标签与左侧的标签相同,只是每个值前面都添加了一个 “1” 。一旦对象被放置在特定的子树中,其最终映射将仅取决于该子树中的权重和节点标签,并且只要该子树的项目保持不变,映射就不会改变。尽管分层决策树在嵌套项目之间引入了一些额外的数据迁移,但此策略将移动保持在合理水平,同时即使对于非常大的存储桶也能提供高效的映射。
|
假设一个 bucket 的信息如上,则根据上面的 bucket 生成的 tree 的基础信息为,depth = 3 ,num_nodes = 8 ,生成的树结构关系如下(相关代码参见 crush_make_tree_bucket 函数):

代码解析:
|
3.4、Straw Buckets
list buckes 和 tree buckets 的结构使得只需计算有限数量的哈希值并将其与权重进行比较,即可选择桶中的项目。在这样做的过程中,它们会采用分治法,要么优先考虑某些项目(例如,位于列表开头的项目),要么完全无需考虑项目的整个子树。这可以提高副本放置过程的性能,但当桶的内容由于项目的添加、移除或重新调整权重而发生变化时,也可能导致重组行为不理想。
straw buckets 让所有物品都能公平 “竞争” 。通过类似于抽签的过程,每个桶中的项目都会相互竞争以放置副本。要放置副本,需要为桶中的每个项目抽取一根随机长度的签。获取最长签的项目获胜。每根签的长度最初都是一个固定范围内的值,基于 CRUSH 输入 x、副本数量 r 和桶中项目 i 的哈希值。每根签的长度都会根据项目的权重乘以因子,这样权重较大的项目更有可能获胜。虽然此过程(平均而言)几乎比 list buckets慢两倍,甚至比 tree buckets (以对数方式缩放)更慢,但 straw buckets 在修改嵌套项目时可实现最佳数据移动。
straw buckets 的中代码在于签长的计算与选择。相关函数为 int crush_calc_straw(struct crush_map* map, struct crush_bucket_straw* bucket) 。
选择元素的相关伪代码如下:
|
代码解析:
|
3.5、Straw2 Buckets
默认的 bucket 算法。
选择元素的相关伪代码如下:
|
代码解析:
|
四、数据迁移实践分析
4.1、调整 bucket 算法
相关命令:
|
4.2、触发数据迁移
我们可以通过调整 osd 权重来触发数据迁移。
相关命令:
|
4.3、数据分析
相关命令:
|
pg 变化分析脚本:
|
脚本的示例输出信息:
|